Easier lasercut boxes with custom brackets

If you’ve ever made your own boxes or project enclosures on a lasercutter, you’ll know that the options for fastening them together can be a bit limiting. You can use the standard lasercut finger joint and glue your box, like this:

Lasercut finger joints

But then, your box is glued shut; you’re going to have a hard time modifying it. Or, you can get a bit fancier and use a captive nut, like this:

Lasercut captive nuts

Assuming you can find square nuts, that works pretty well in thicker materials, but it’s fiddly, and in thinner materials, like the 3mm or eighth-inch ply and acrylic most of us use, the bolts are as thick as the material, which leads to issues with fragility and bolts and nuts protruding from the joints - not ideal.

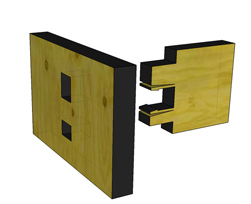
If you want to get really fancy, you can make a tab-and-slot joint with a lasercut clip:

Tab and slot joint

(Images courtesy this excellent Make article)

These work great in acrylic, but ply isn’t robust enough, and you can’t build your box with flush corners.

There must be a better way to do this, right? That’s what I thought, and the humble angle bracket comes to our rescue.

We spent some time looking, and it turns out that nobody makes small, pretapped angle brackets for M3 screws. So we decided to do something about that, and re-entered the exciting world of Chinese outsourcing to find someone who could make us the perfect bracket for assembling lasercut enclosures.

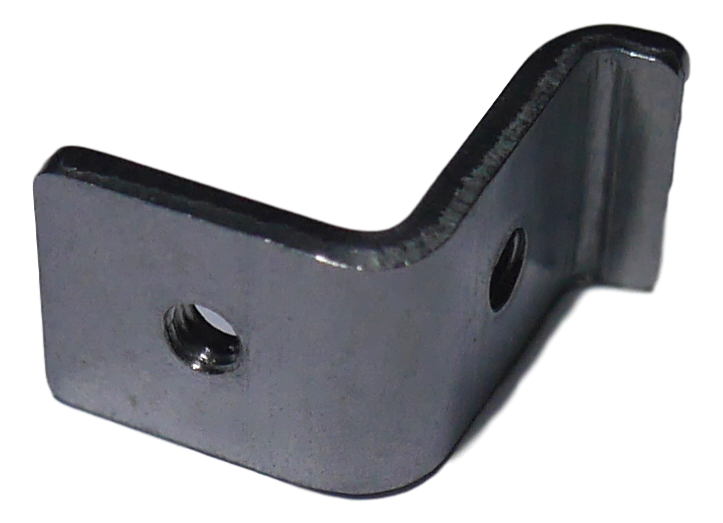
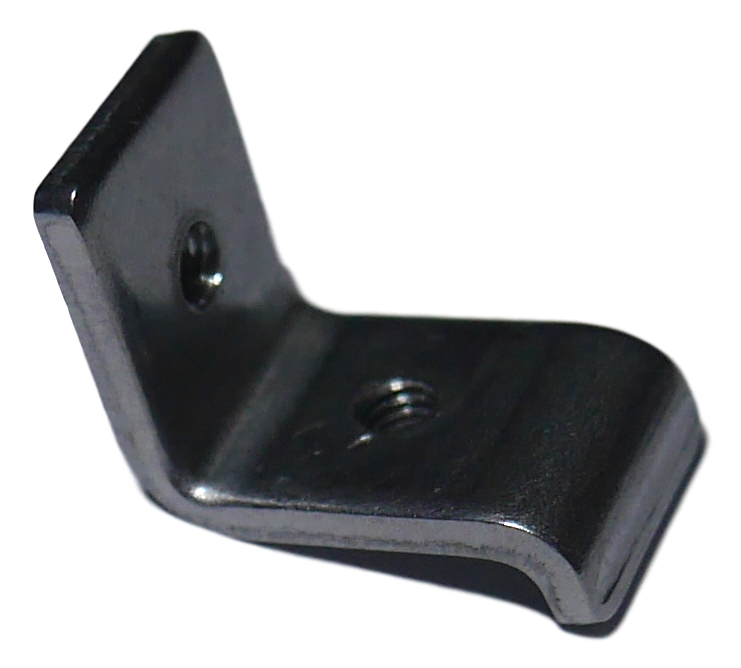
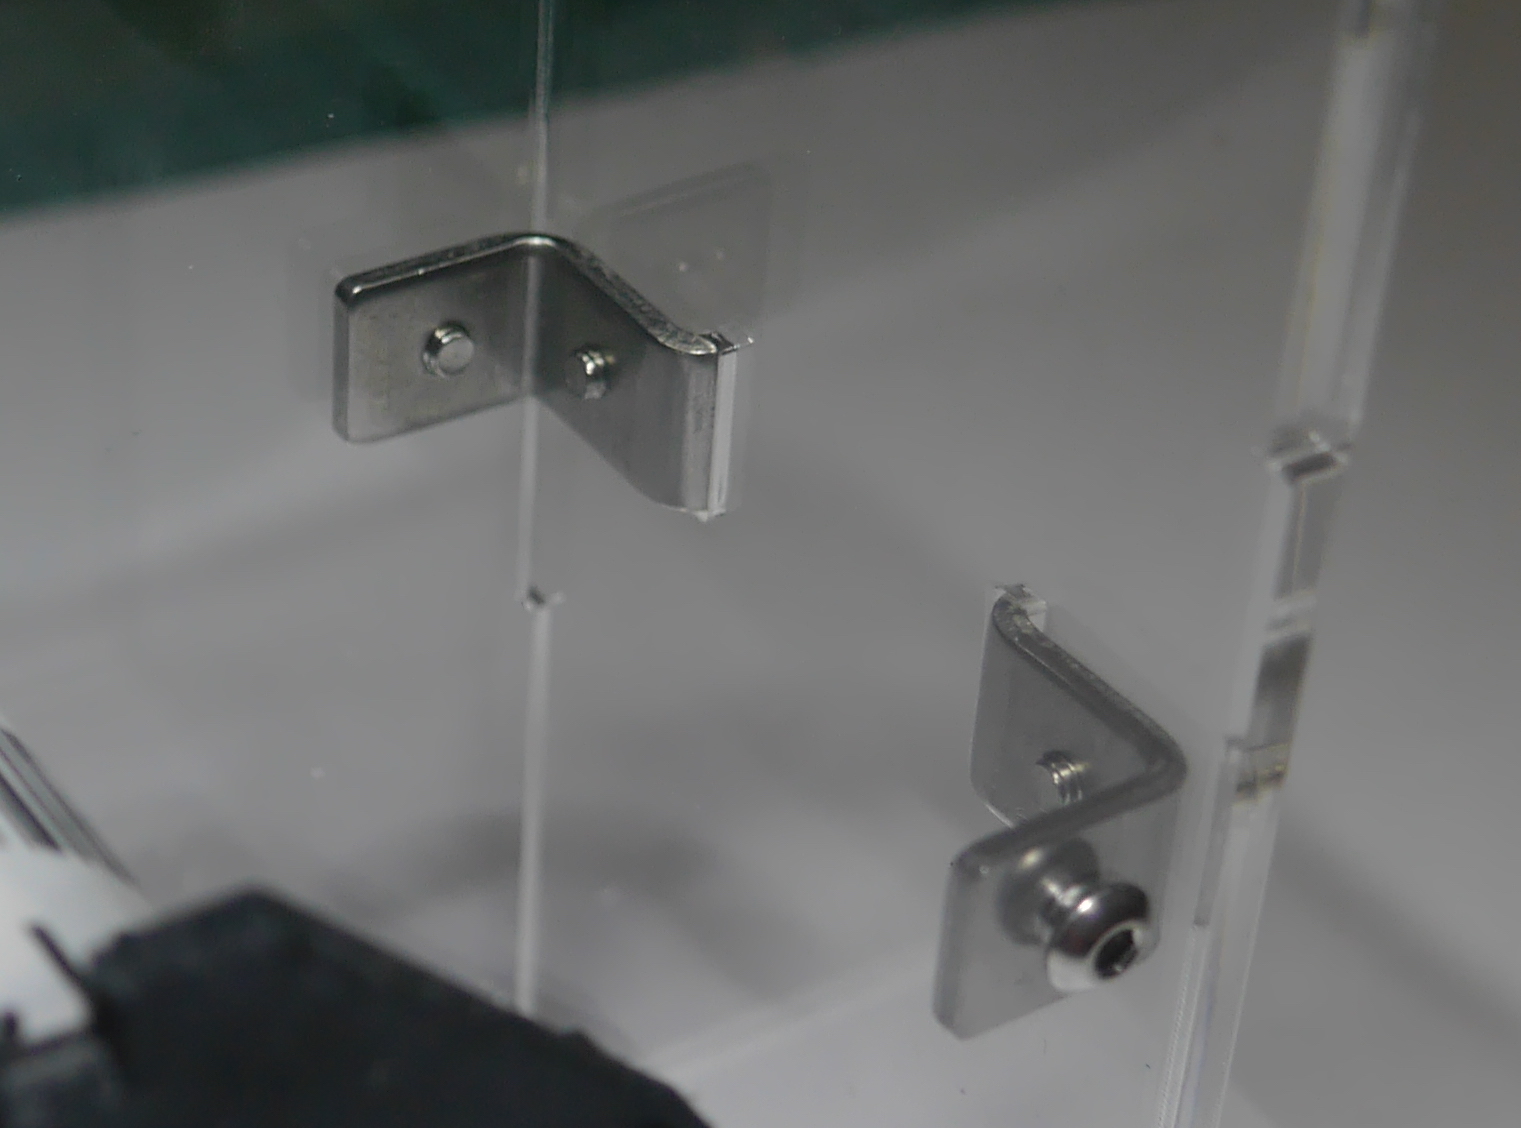
With a little searching, we found someone who could do what we needed, at a price that’s reasonable. I present, the Arachnid Labs Angle Bracket:

Angle bracket Angle bracket top

At its core, it’s a simple L-shaped angle bracket, with two pretapped M3 holes. It replaces two nuts, and with a few of them you can assemble a wide array of boxes and enclosures with very little time and trouble. The results are significantly more robust than you’d see with most other techniques, too.

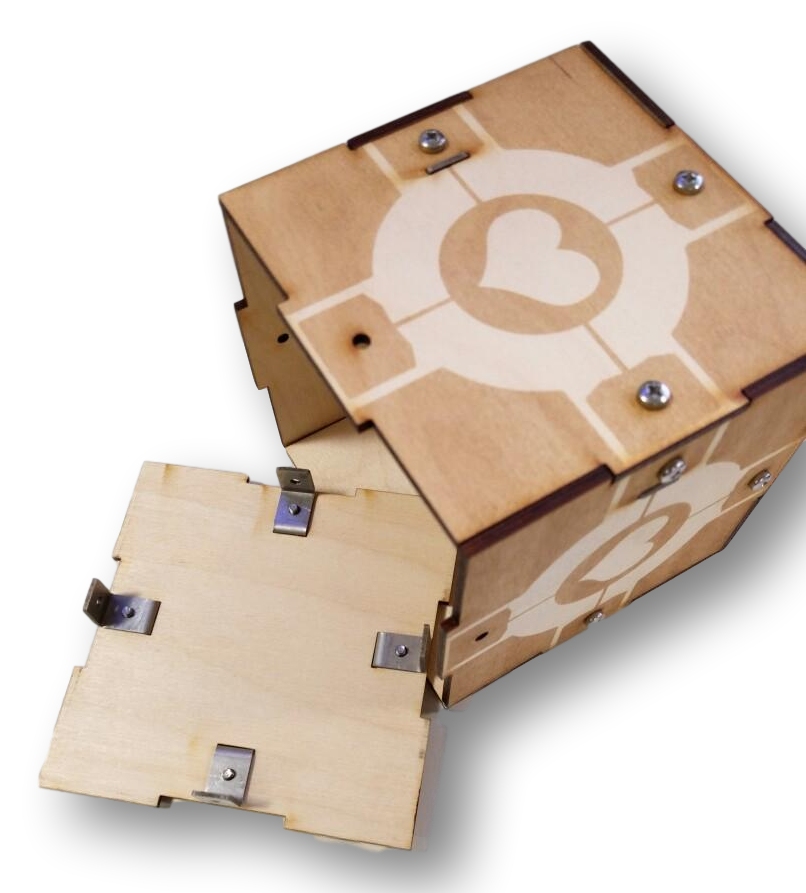
Companion cube lasercut box

What makes the brackets really easy to work with is the extra tab you see sticking out on one side. By cutting a matching slot into one side of the joint, you can easily position the bracket during assembly, lining it up for the screw perfectly.

Example bracket installation

We’ve had a small production run of 1000 brackets made to test out, and they came out brilliantly.

If you think you’d find some useful, and would like to try them out, here’s the deal: We’re selling packs of 50 from the first batch for £9 or $12.50 USD plus shipping from the UK. 50 brackets is enough to make 4-6 complete boxes, depending on your requirements.

What’s more, we’d really like to see people making cool stuff with these, so if you buy a pack, make something neat, and publish the plans, we’ll refund you the cost of the brackets.

So who wants some free brackets? Email [email protected] with your address, and we’ll get you sorted out.

Oh, and if you have an idea for a better name than “Arachnid Labs Angle Brackets”, we need to talk too.

Comment

Books that think (and play Hangman)

A good book makes you think. But what if you make the book think, instead?

I’ve long been fascinated with the idea of inanimate objects that compute, or otherwise do things outside the bounds of their normal function. Examples of this include mechanical calculators, slide rules, and choose your own adventure books; a more recent and directly relevant example is Tic Tac Tome, a book that will play you at Tic-tac-toe.

What these all have in common is that they’re an otherwise inert object that, when a human operator follows a set of directions, can ‘execute’ algorithms or produce behaviours beyond that which the object itself can achieve. They’re a real life example of a chinese room.

When a friend recently asked if a book could play Hangman, it set me thinking about these sort of objects, again, and I decided to see just how practical it was. It turns out that yes, you can ‘teach’ a book to play Hangman, and it does a decent job of it, too.

The first task is to pick a word list to use. I wanted something that included many common words, and which I could tune to the size I needed; that eliminated ordinary word lists. I also wanted to restrict it to nouns, since (in my experience, at least) that’s what people most often guess in hangman.

In the end, the Google Books n-gram corpus proved to be a good match. The 1-gram list provides an enormous dataset of words, frequency counts (by book and total occurrences) part of speech, and publication date, and with a little work can be used to extract, say, the most common 50,000 nouns in books published since 1980. A little sanitisation is necessary; the list contains many nonwords and proper nouns, and particularly short words (fewer than 3 characters) and particularly long ones (longer than, say, 15 characters) aren’t particularly interesting for Hangman. Eliminating the nonwords is easily done by comparng the list against a regular dictionary; I used the scrabble dictionary.

Then, it’s a matter of figuring out the best way to transcribe a game of hangman - or, really, all possible games of hangman - into book form. This also turns out to be relatively straightforward, and works like this:

  1. Pick the most common letter from your list of words, and guess that.
  2. Separate the words into groups according to the pattern they make with that letter guessed (eg, 'dead' when guessing 'e' produces the pattern '_e__')
  3. For each group created, repeat from step 1 with just those words.

This recursive procedure creates a tree structure, with each node corresponding to a guess the book makes. Leaf nodes represent final guesses, where the book declares “your word is ‘dead’!”. A few more tweaks and improvements are necessary; for instance, there’s no point guessing a letter if every remaining word contains it, and there’s likewise no point in using up your last guess if there’s only two options and you can only get one of them right.

After building the tree structure and cleaning it up a bit, formatting it into book form is a relatively straightforward matter of writing CSS and HTML. I found it worked best when sections are sorted topologically, so you always proceed forwards through the book as it makes guesses, and each section tends to be close to the previous one.

One advantage of the way we chose the wordlist at the beginning is that you can tune the length of the wordlist to suit the size of the book you want to produce. I wanted something that was a reasonable, usable size, so I settled on 500 pages; this works out to about 4000 words. A simple second pass that identifies words that can be added without requiring new sections brings the total count up to about 6800 words.

It’s interesting to note that shorter words are much harder to guess in hangman than longer ones, because they have fewer letters, and form fewer patterns with the letters they do have. You’re better thinking of ‘sky’ than ‘disciplinarian’ when it comes to hangman. As a result, there are a few short common words that the book knows of but can’t guess in the alotted number of wrong guesses (6, in the version I always played growing up), none of them longer than 5 characters. In the other direction, if you pick a long word that it knows, it may well figure it out after just a single guessed letter!

And, to answer the question you’re undoubtedly asking right now: Yes, this exists as a real book. I’m calling it Dead Tree, and thanks to the wonders of print-on-demand, it’s available now from amazon.com and amazon.co.uk, just in time for the holiday season. If you know a geek who’s as fascinated as me with things that compute, this might make a good gift for them.

What’s more, the book is open-source, and you can find the source files - wordlist, generating program, and everything else, here on GitHub.

Comment

Tsunami is now part of Arduino AtHeart!

I’m delighted to announce that Tsunami is now officially a part of the Arduino AtHeart program!

Arduino AtHeart

Arduino AtHeart is a program run by our good friends at Arduino LLC (who you may know as arduino.cc), and serves to identify products that are based on Arduino technology. The Arduino AtHeart marking means you can be confident the Tsunami will work and be fully supported by the Arduino IDE, and that you’ll be able to use the same skills you’ve learned on Arduino boards such as the Leonardo. A proportion of all Tsunami sales goes to Arduino LLC to support their excellent work on the Arduino platform.

Unless you’ve had your head buried in the sand, you’ll have heard of the current situation around Arduino LLC vs Arduino SRL (formerly Smart Projects SRL). Here at Arachnid Labs, we’re firmly behind Massimo and his band at Arduino LLC, as the true progenitors of the Arduino platform and community, and we’re delighted to be able to support them in a tangible way by contributing back to the project that started it all.

If you’d like to help support the Real Arduino too, and you haven’t already, you can preorder a Tsunami here.

Comment

Arachnid Labs on Wired!

Wired have a great article up about MacroFab, Crowd Supply, and us! It’s a good explanation of how MacroFab are making it easier for us and others to manufacture small run electronics affordably in the US. We couldn’t be happier with MacroFab, so we’re delighted to see them getting press!

Crowd Supply have also written a post about MacroFab, based on our experiences.

Are you thinking of using MacroFab for your own projects, or sending them to China? Tell us about it on the forum.

Comment

Join the new Arachnid Labs forums!

In response to numerous requests, we’ve set up a discussion forum where you can talk about Arachnid Labs products, as well as general electronics and maker-related topics. It’s up now at discuss.arachnidlabs.com, and linked in the menu at the top.

As an extra incentive, we’ve posted a small hint as to what our next project and product will be. But, you’ll have to sign in to see it!

We’re using the excellent Discourse package to host the forums. You’ll need to sign up to comment, but it supports single-signon via Google, Twitter, or Github if you don’t want to create a new account.

We’re also migrating blog comments over to use Discourse. Because migration is difficult, we’ve left old blog posts using Disqus for now; new ones (like this!) will use Discourse for comments.

Enjoy!

Comment

Last 48 hours for the Tsunami on Kickstarter!

There’s only 48 hours left to run on the Tsunami Kickstarter! We’ve crushed our goal, and we’ve got some cool stretch goals still to hit: if we make it to £17,500, everyone gets an upgraded 10-bit DAC!

This is your last chance to get a Tsunami at Kickstarter prices - it’ll be substantially more expensive afterwards. What are you waiting for? Back it now before it’s too late!

Comment

Modern day PALs with Greenpak

I was recently reminded about a very nifty little programmable logic chip that hasn’t seen nearly enough attention from hobbyists and makers. Let me tell you about it.

Background

Working on the Tsunami Kickstarter recently, a backer asked about including a frequency divider on the front end, to allow for higher speed and better accuracy frequency counting. Using a programmable divider in front of the timer capture pin would mean lower software overhead when doing frequency counting, and permit greater accuracy for counting high frequencies: counting 256 iterations of a 2MHz signal gives you more accuracy than counting just one.

My initial reaction was to say that it wasn’t practical to add that functionality at this point in the design, but it set me thinking, and against my better judgement I started to look at the options.

A programmable frequency divider seemed the obvious solution, but the only one that came up on a quick search was obsolete and likely in too large a package. Doing this with separate components would require two ICs - a counter and a demux. Besides, this was all theoretical, right? It’s too late to make significant changes.

Not so long ago, something like this would have been solved using something such as a PAL. Of course, those have since been obsoleted by CPLDs and FPGAs, but even the smallest and cheapest of those have a great many pins and would add significantly to the Bill of Materials cost for my project.

Enter Greenpak

At that point I was reminded of a development kit I bought 6 months ago and hadn’t used, for a neat little series of chips called greenpak3. Greenpaks are something like a modern take on PALs. Each one contains a collection of digital building blocks, such as lookup tables, flipflops, and counters, and a flexible routing matrix that allows you to connect them up as needed. Better yet, they’re cheap, starting at about $0.50 each in quantities I was likely to need, coming preprogrammed with your design from the factory. I already had a discrete XOR gate on the board that I was using as part of the input signal chain - I could eliminate that, and for only 8 cents extra, get a device I could program with a bunch of extra functionality too.

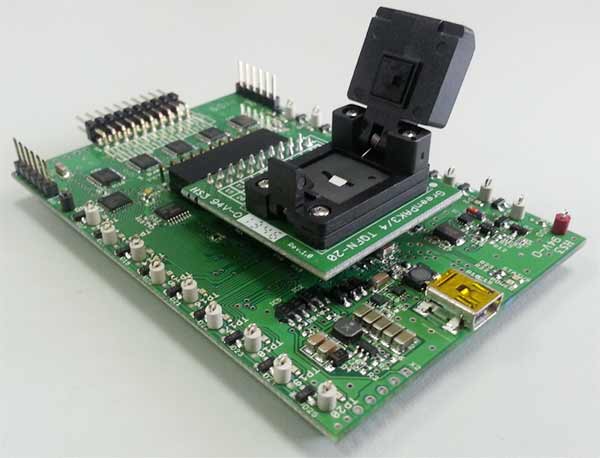
The Greenpak3 development kit comes with a nice little test and programming board and a bunch of samples of the various chips in the range. The development board supports what they call ‘emulation’, but what it’s actually doing is writing your design to the chip in temporary memory so you can test it out. You can do this as many times as you want, but once you program it for real, that’s it: your chip will only ever function like that, no backsies.
Greenpak3 devkit

On the dev board, there’s testpoints for each of the pins on the chip, and the IDE has a very nice interface to send digital and analog waveforms to the chip, as well as enabling the onboard LEDs, and configuring keyboard shortcuts to turn signals on and off. You can hook your scope up to the test points, or input signals on the expansion connector.
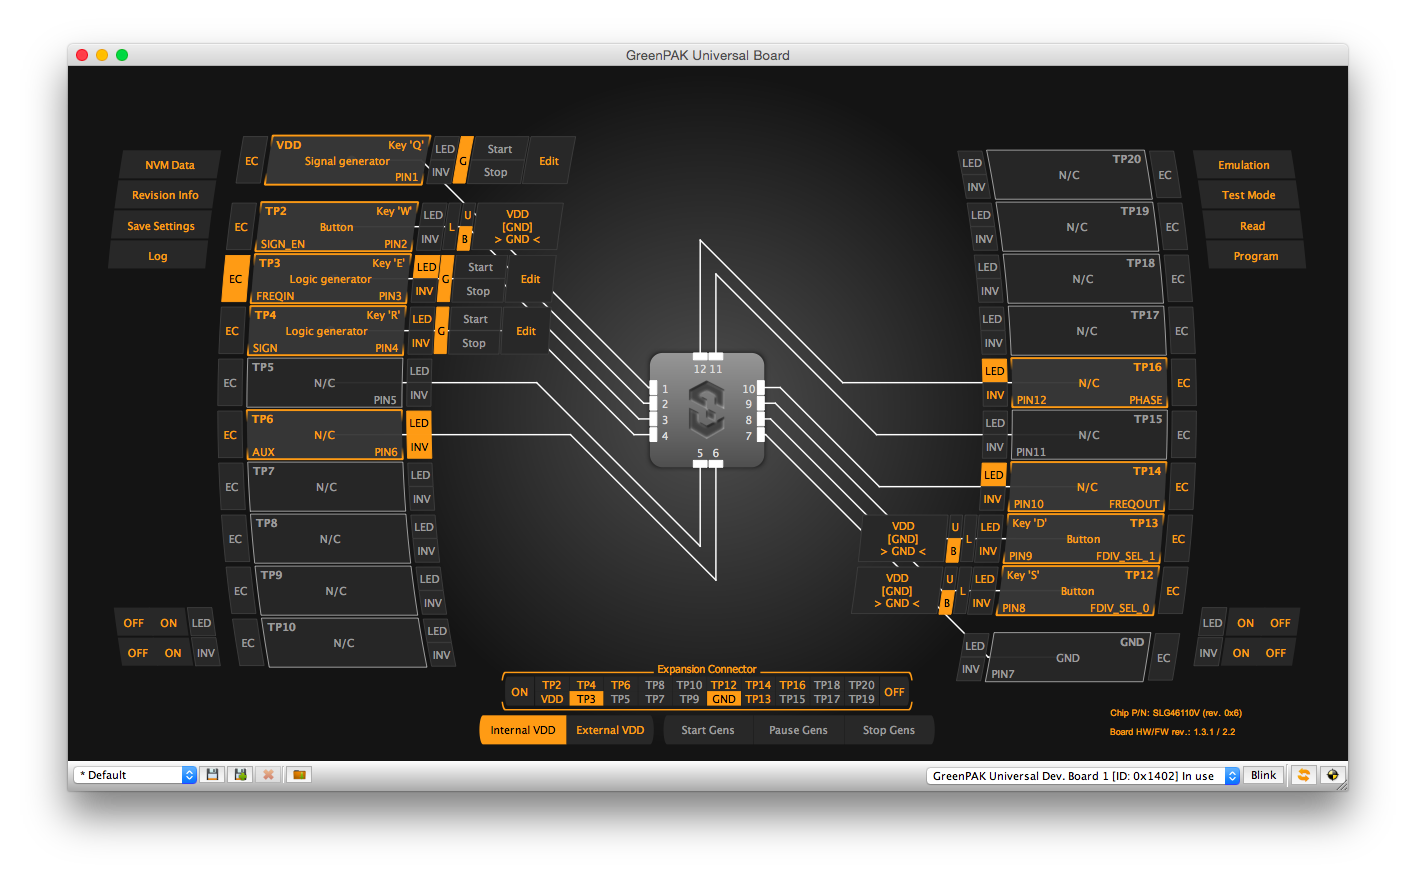
Naturally, I whipped out the devkit and set to work trying to see if I could implement my required logic on one of their cheap-as-chips chips. Their IDE uses a drag-and-drop style of programming, drawing wires between inputs and outputs in a manner that will be familiar to anyone who’s used an EDA tool before. Individual components are configured by clicking them, where settings can be set, and truth tables entered.

I wanted my new chip to do three things:

  1. Replace the discrete XOR IC used in the phase detector.
  2. Add a frequency divider for the timer input on the AVR.
  3. Make it possible to use the square wave output from the DDS without outputting it on the aux connector.

After an hour or so’s work, I had this to show for myself:
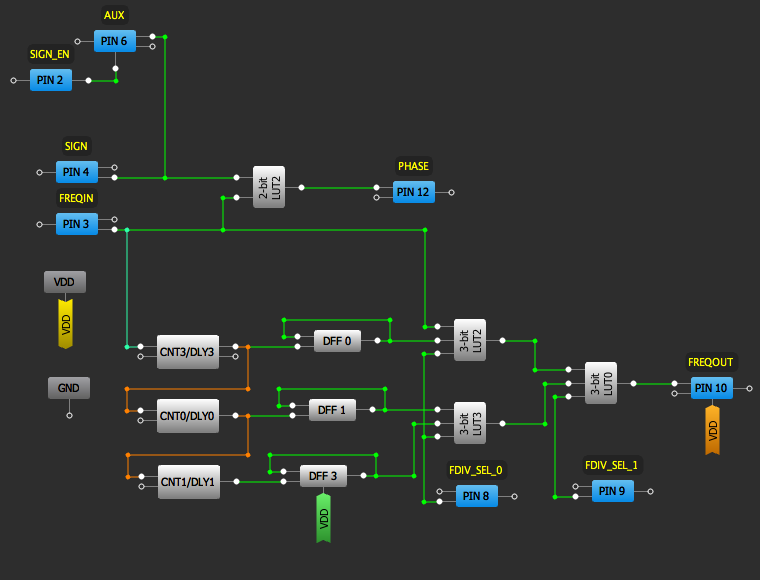
Tsunami greenpak3 design

In the top left the square wave signals from the input comparator and the DDS chip come in on pins 3 and 4, respectively. The component marked “2-bit LUT2” implements the original functionality of the XOR IC, outputting the resulting signal on Pin 12. That’s goal 1 sorted!

Pin 2 acts as an output enable for the DDS’s square wave output on pin 6, which is connected to the AUX connector. There’s goal 2.

The rest of the circuit is concerned with implementing the frequency divider. In brief, the signal coming in on pin 3 is fed into a series of chained counters (CNT0/DLY0, 1, and 3), each one dividing it down further. A flipflop on the output of each takes the short pulse each counter outputs when it overflows and turns it into a proper 50% duty cycle square wave. And the three components marked LUT0, LUT2, and LUT3 act as a 4:1 multiplexer, allowing two external pins to control which of the divided signals gets output to the microcontroller. Presto, goal 3: selectable frequency division by 1, 16, 256 or 4096.

Another hour’s work with the devkit, emulator, and my scope, and I was able to verify that everything behaved as expected. And half an hour in diptrace proved that removing the XOR and adding this new chip was quite straightforward. I still had time to rush the design revision off to Macrofab before they sent the release candidate 1 boards off for production.

This also feels like significantly less design risk and cost than integrating two new chips to perform this function; if that were the only option, the Tsunami would have remained as it was. As it is, I’m waiting for the first releease candidate boards so I can run a full set of tests in-situ, but I’m very optimistic. For the cost of 8 cents per Tsunami and a few hours of my time, I was able to add some truly useful new features.

Maker friendly?

It’s hard to see why these little chips aren’t more popular and well known, especially with hobbyists, than they are now. They’re really cheap, the devkit is affordable at only $60, and Silego will produce a run of chips preprogrammed with your design on tape-and-reel at quantities starting at 1, for a very nominal price; the $0.50 price I keep quoting includes programming at quantities from 250 units and up. The IDE is available for Windows, Mac, and Linux.

Their datasheets even fully document the bitstream the chips use for programming; this chip is just dying for someone to write a VHDL or Verilog compiler for it.

There’s just one thing: these little chips really are just that: little. The standard package is an 0.4mm pitch QFN. The part I’m using has 12 pads, which means it’s only 2mm on a side. For a sense of scale, here’s me holding one.
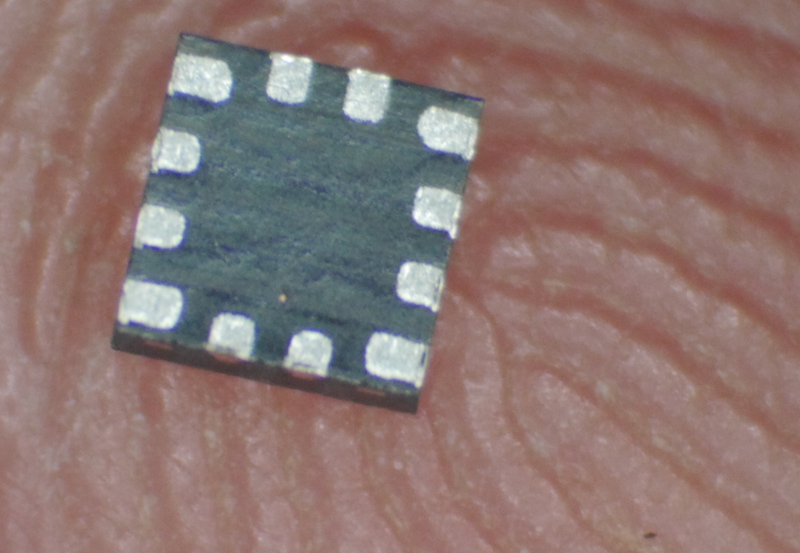
tiny greenpak

Yes, that’s the pad of my thumb. These things really are tiny, and that really can be a bit of an impediment. Anyone with a soldering iron, some flux, and a bit of magnification can solder these - though having hot air certainly makes life simpler - but prototyping on a breadboard is going to be tough, and they certainly require a bit of patience to get right by hand on a PCB, unless you’ve got stencils and solderpaste.

The obvious solution to this is breakout boards; you’ll still need to solder them on, but from there you can plug them into a breadboard and use them like regular DIP chips. Or, to take it a step further, prepopulated breakouts, and an adapter for their excellent devkit to allow programming them in that form factor. Any takers?

Full disclosure: I don’t have any association with Silego or their parts other than being a happy customer. I just think their stuff is neat, and wanted to tell people about it.

Comment

Tsunami signal generator up on Kickstarter

We’ve just launched our next product, the Tsunami, and it’s up on Kickstarter!

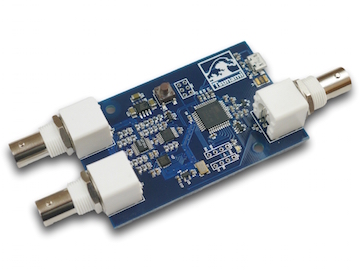
The Tsunami is a powerful and flexible signal generator built on the Arduino platform. It’s the best way to get started experimenting with analog signals, and a great tool for a huge variety of tasks, too.

The tsunami takes the versatile processor behind the Arduino Leonardo, and combines it with a Direct Digital Synthesis chip, which makes generating analog signals incredibly straightforward. It also has flexible input and output circuitry, and an easy to use software library, to make working with analog signals as easy as blinking an LED.

We’re aiming for a £10,000 goal to be able to manufacture the Tsunami, and there’s just 21 days to get there. If it sounds like the sort of thing you’d find useful, go back it now!

Comment

Re:load Pro Fan Kit now available for preorder

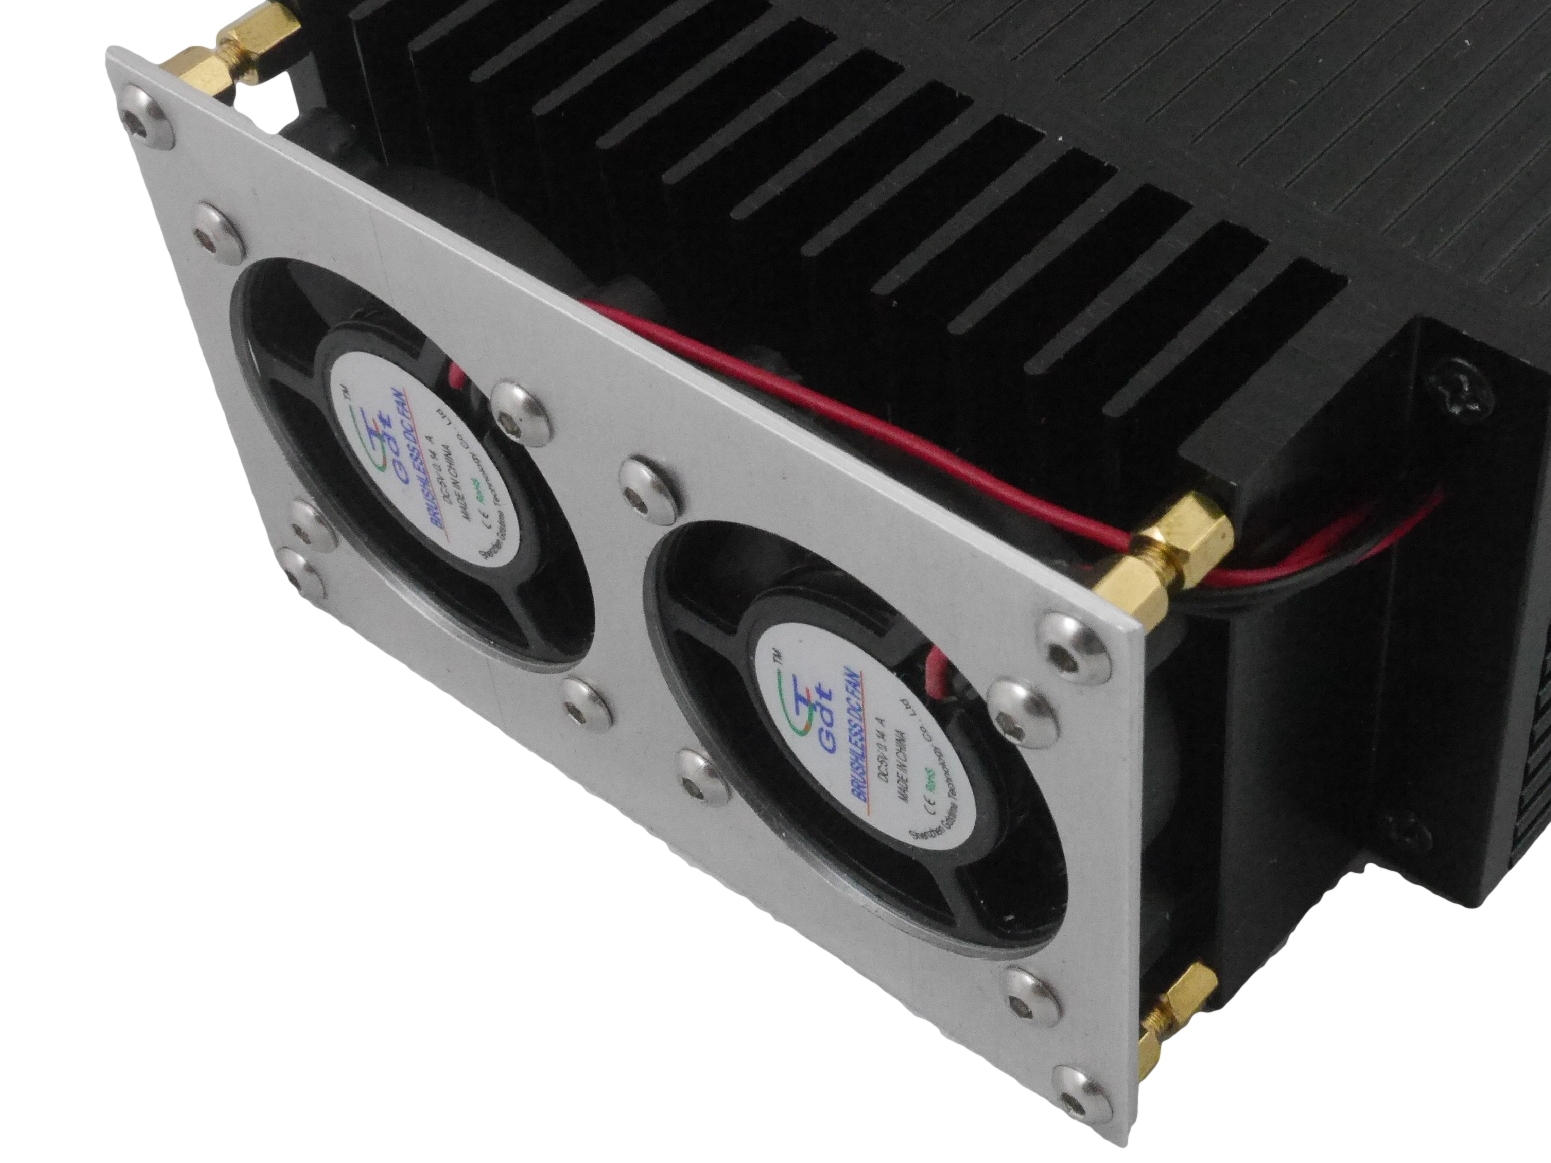
You’ve been waiting for it with bated breath, and now it’s here: the Re:load Pro fan kit!

We’ll be accepting earlybird preorders for the next 7 days here at the limited time price of £20 plus shipping. Once the time’s up, if we have enough preorders to cover the tooling costs, we’ll start manufacturing, with delivery expected in January.

The fan kit contains everything you need to boost your Re:load Pro’s sustained power limit from 25 watts to 50 watts.

The kit includes a populated PCB with dual smart fan controllers, and all parts and mounting hardware required to set it up on your Re:load Pro. Fan speed is automatically managed to minimise fan noise and wasted power through a thermocouple that detects heatsink temperature and adjusts fan speed accordingly. The fan controller can also detect and restart stalled fans.

Under low load conditions, the fans are stationary. As load - and thus temperature - increases, the fans start, gradually ramping up to full speed as needed to maintain the temperature.

Package contents:

  • Fully populated fan kit PCB
  • Thermocouple Headers for attaching fan kit PCB to Re:load Pro expansion slot
  • Two 40mm fans
  • Aluminium mounting plate, standoffs and screws for attaching fans to Re:load Pro
  • 0.9mm hex key for removing the knob from the Re:load Pro front panel during disassembly

We’re only running the preorder for a limited time, after which prices will go up to the normal rate of £25, so if you know anyone with a Re:load Pro who might like one, now’s the time - preorder one now!

Comment

See us at Elephant and Castle Mini Maker faire

We’re going to be at Elephant & Castle Mini Maker Faire tomorrow! Come see us at our booth, where we’ll be demoing and selling the minishift, making Robot Buttons, and showing off a top secret new project!

Comment